
Posted by Becky T on Mar 20th 2024
Friendship Bracelets 4-Ways
March is National Craft Month! Celebrate and learn how to make classic friendship bracelets!
Friendship bracelets are the perfect group activity for picnics, beach trips, road trips, and parties!
Gather your friends, supplies, and away we go!


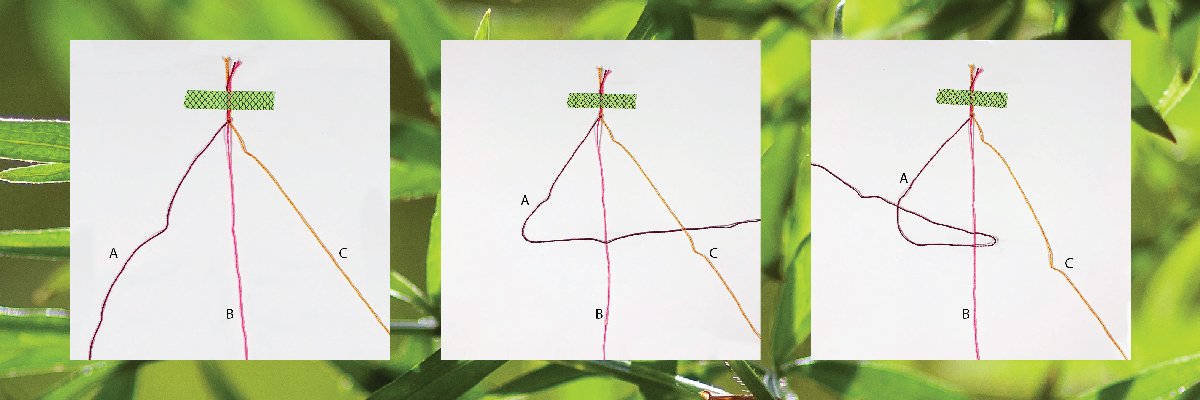
The Zipper
- You’ll Need:
- 3 (A, B, C) or 6 pieces of string, 24-27 inches long. The middle string (3-strand) or middle 2 strings (6-strand) can be 15 inches and will not be seen in the final pattern.
Tape or safety pin to hold down the bracelet while you work. Tie a knot and secure your strings with tape, or a pin. Split your strings with B in the middle (duh), start by taking A on the left and crossing them in front of the B string, creating a ‘4’. Bring string A under and through the 4 and pull the knot up and tight. Now take C and create a backward 4 over B, pull C up and through the middle of the 4 and pull tight. Repeat these two steps until your bracelet is the desired length. Finish with a knot.

The Braided Chevron
- You’ll Need:
- 8 pieces of string, 24-27 inches. A, B, C, D, A2, B2, C2, D2.
- Tape or safety pin to hold down the bracelet while you work.
Tie a knot or loop, split, and lay out your strings in your desired color order, mirroring the order on the right side. Begin by ‘braiding’ the strings alternating sides: bring A from the left side into the middle and A2 from the right side into the middle. Bring B from the left to the middle and B2 from the left to the middle. Repeat with all the colors, it will get easier as you go along. Tie off with a knot!
![]()
![]()
The Knotted Chevron
- You’ll Need:
- 4 or 8 pieces of string, 24-27 inches. A, B, C, D, A2, B2, C2, D2.
- Tape or safety pin to hold down the bracelet while you work.
Tie a knot, layout strings in color order, mirroring on the right side. Begin by taking A and looping it over B in a 4 shape, bring A under and through the middle of the 4 pulling up and tight, repeat. You will have created two knots with A over B. Next take A and create your 2 knots over string C, then D so you end up with A in the middle of your strings. Now for the other side, take string A2 and create a backward 4 shape over B2, pull A2 under and through the middle of the 4, pull up and tight. Repeat. Take A2 and create your 4-knot over C2 and then D2. Now A and A2 are both in the middle of your pattern, tie these two together with a simple knot. Repeat this process with all colors until you have reached your desired length, you can also finish with a braid so it’s easier to tie off. Tie a knot.
![]()

The Spiral
- You’ll Need:
- 3 or more strings, 2-3 arms length long.
- Tape or safety pin to hold down the bracelet while you work.

Gather all the strands and find the middle, tie a knot to form a loop. Take your first color and create a 4 shape over ALL the other strings. Bring the string up and through the middle of the 4, pull up and tight. Repeat 5-7 times with the same color. Switch to your next color and repeat. Keep repeating these steps until you have reached your desired length. Finish with a knot.
- Small wrist: 25-30 inches
- Medium wrist: 30-35 inches
- Large wrist: 35-40 inches
General Size Guide

Let's get crafty! Find everything you need to make your friendship bracelets in-store or online here!